How to reduce the size of a PowerPoint File
Compress pictures in your presentation
-
Select a picture in your document. The Picture Format tab appears.
-
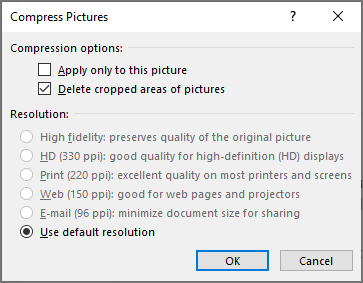
On the Picture Format tab, in the Adjust group, select Compress Pictures.
-
Under Compression options, do any of the following:
-
Make sure that Apply only to this picture is not selected so that the changes you make here will apply to all pictures in the document.
-
Select Delete cropped areas of pictures. This option removes the cropped picture data but note that if you delete the cropped picture data, you won't be able to restore it.
-
Under Resolution, select Use default resolution.

-
Delete image editing data and lower default resolution
By default, when you edit an image, the data from the original is retained (to ensure the image can be restored). Discarding it means that you can't restore the changes you make, but it will reduce your file size. Lowering the default resolution for images also reduces your overall file size.
-
Go to File > Options > Advanced.
-
Under Image Size and Quality, do the following:
-
Select Discard editing data. This option removes stored data that's used to restore the image to its original state after it's been edited. Note that if you discard editing data, you won't be able to restore the image after you edit it.
-
Make sure that Do not compress images in file is not selected.
-
In the Default resolution list, select a resolution that is 150ppi or lower.

-


Connect with Northeast State